# Configuring Analog Inputs

In this example we'll configure Local I/O Channel 1 to operate as an analog input measuring a pump pressure sensor.

First click on Local I/O Channel 1 in the sidebar to go to the channel settings view:

<figure><img src="https://1557066017-files.gitbook.io/~/files/v0/b/gitbook-x-prod.appspot.com/o/spaces%2FSPy42kVbNL57hubF20gF%2Fuploads%2Fgit-blob-0667df6ab5e38107743f7c5300b5bbf75715eefd%2Flocalhost_50000_channel_1%20(12).png?alt=media" alt=""><figcaption></figcaption></figure>

Then in the view that appears, click **Analog Input**:

<figure><img src="https://1557066017-files.gitbook.io/~/files/v0/b/gitbook-x-prod.appspot.com/o/spaces%2FSPy42kVbNL57hubF20gF%2Fuploads%2Fgit-blob-bd91c59fe5812dbe3bd39494f6ef0c99f87362b1%2Flocalhost_50000_channel_1%20(2).png?alt=media" alt=""><figcaption></figcaption></figure>

Then click save:

<figure><img src="https://1557066017-files.gitbook.io/~/files/v0/b/gitbook-x-prod.appspot.com/o/spaces%2FSPy42kVbNL57hubF20gF%2Fuploads%2Fgit-blob-4941a96fd65c791fe2f5f96a0da0d2bdb656a463%2Flocalhost_50000_channel_1%20(4).png?alt=media" alt=""><figcaption></figcaption></figure>

Notice how the status panel at the top has changed to show the **Raw Input** (the raw value coming into the input) and the **System Value**:

<figure><img src="https://1557066017-files.gitbook.io/~/files/v0/b/gitbook-x-prod.appspot.com/o/spaces%2FSPy42kVbNL57hubF20gF%2Fuploads%2Fgit-blob-d6aab192e628d1da5529893fdb1ac73677b2c4f4%2Flocalhost_50000_channel_1%20(5).png?alt=media" alt=""><figcaption></figcaption></figure>

The **System Value** is the value that gets written to the channel's configured **Tag** (in this case, **channel1**):

<figure><img src="https://1557066017-files.gitbook.io/~/files/v0/b/gitbook-x-prod.appspot.com/o/spaces%2FSPy42kVbNL57hubF20gF%2Fuploads%2Fgit-blob-305fcd3e92d863d32d9455b0d543e2d4d43bc9f9%2Flocalhost_50000_channel_1%20(7).png?alt=media" alt=""><figcaption></figcaption></figure>

The **Raw Input** and **System Value** may differ depending on the **Dead Band, Rounding,** and **Calibration**:

<figure><img src="https://1557066017-files.gitbook.io/~/files/v0/b/gitbook-x-prod.appspot.com/o/spaces%2FSPy42kVbNL57hubF20gF%2Fuploads%2Fgit-blob-a00e4ec1a6c7cf7d89dfadf0e0eeae113fc321ed%2Flocalhost_50000_channel_1%20(15).png?alt=media" alt=""><figcaption></figcaption></figure>

The additional **Units**, **Range Min**, **Range Max**, and **Display Precision** parameters affect how the **System Value** is displayed in gauges:

<figure><img src="https://1557066017-files.gitbook.io/~/files/v0/b/gitbook-x-prod.appspot.com/o/spaces%2FSPy42kVbNL57hubF20gF%2Fuploads%2Fgit-blob-e5bd7805731fc372cd06c3a650a3ff4a9bf7a777%2Flocalhost_50000_channel_1%20(16).png?alt=media" alt=""><figcaption></figcaption></figure>

In this example, we'll enter the following settings for a fictional pump. Make sure to click **Save** after entering these values.

<figure><img src="https://1557066017-files.gitbook.io/~/files/v0/b/gitbook-x-prod.appspot.com/o/spaces%2FSPy42kVbNL57hubF20gF%2Fuploads%2Fgit-blob-d1d7878b82ae1f93b083e811763c40c9b7ac1eac%2Flocalhost_50000_channel_1%20(18).png?alt=media" alt=""><figcaption></figcaption></figure>

### Calibration

To ensure accuracy, the Analog Input must be calibrated. To do this click the **Calibration** button:

<figure><img src="https://1557066017-files.gitbook.io/~/files/v0/b/gitbook-x-prod.appspot.com/o/spaces%2FSPy42kVbNL57hubF20gF%2Fuploads%2Fgit-blob-c5880c5b37e65b3b610ea5494ecfc320c6b2a643%2Flocalhost_50000_channel_1%20(10).png?alt=media" alt=""><figcaption></figcaption></figure>

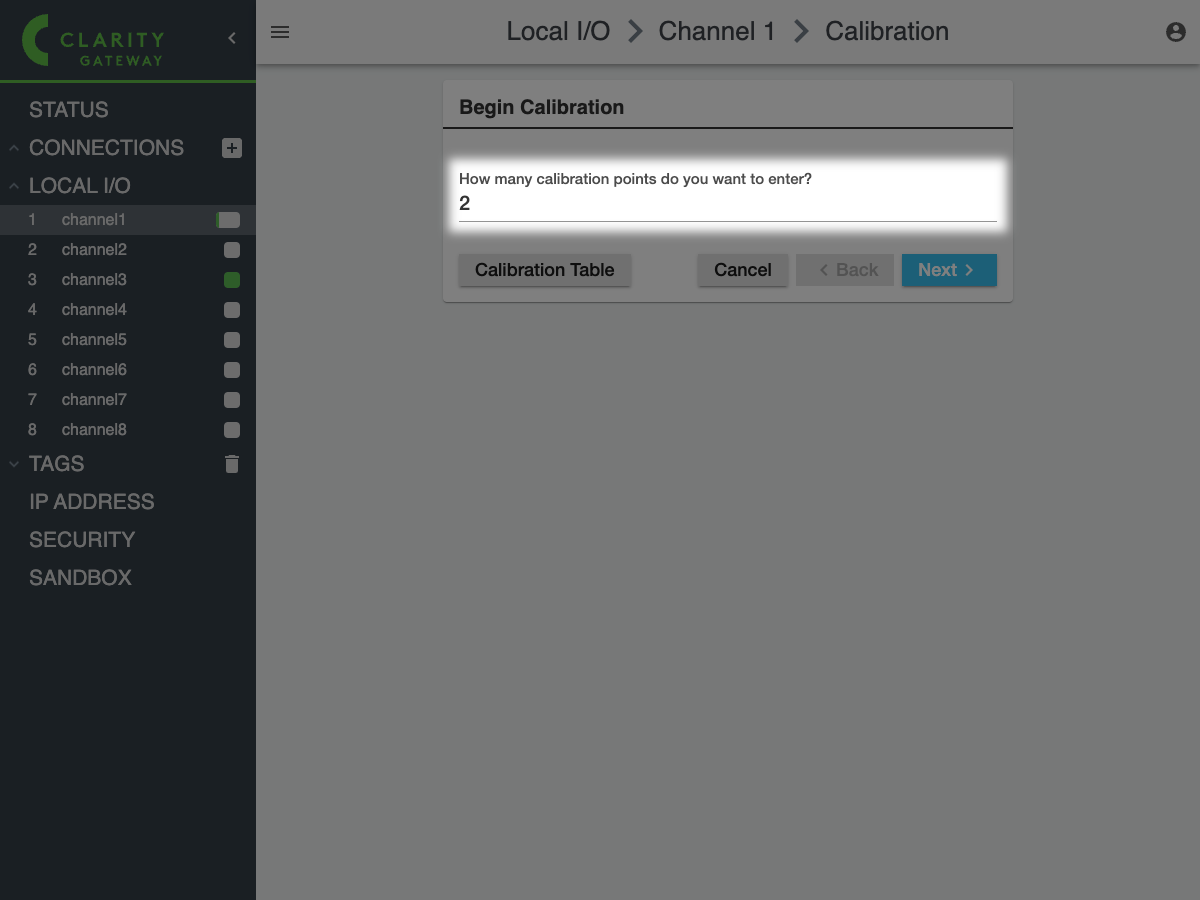
The next screen will ask how many calibration points you want to enter. In this example, we'll enter just **2** (the minimum):

<figure><img src="https://1557066017-files.gitbook.io/~/files/v0/b/gitbook-x-prod.appspot.com/o/spaces%2FSPy42kVbNL57hubF20gF%2Fuploads%2Fgit-blob-ab439d40e545d3aa46f3e5c06f3ccc41ec32f510%2Flocalhost_50000_channel_1_calibration.png?alt=media" alt=""><figcaption></figcaption></figure>

Then click **Next**. The following screen will show you the live **Raw Input** value and have you enter the **Actual Value** corresponding to it. For example, say the pressure sensor is driving the input at **5.23 V** when at atmospheric pressure (**101.325 kPa**):

<figure><img src="https://1557066017-files.gitbook.io/~/files/v0/b/gitbook-x-prod.appspot.com/o/spaces%2FSPy42kVbNL57hubF20gF%2Fuploads%2Fgit-blob-2d355ba2c99e28a935152ead505c5c43bc0f2f2d%2Flocalhost_50000_channel_1_calibration%20(2).png?alt=media" alt=""><figcaption></figcaption></figure>

Click **Next**. Then, change your system to another known value (for example **150 kPa**), and enter that as the **Actual Value** corresponding to the **Raw Input** value (in this case, **9.82 V**):

<figure><img src="https://1557066017-files.gitbook.io/~/files/v0/b/gitbook-x-prod.appspot.com/o/spaces%2FSPy42kVbNL57hubF20gF%2Fuploads%2Fgit-blob-1511525b74dcb12f5bbbdc101daff055b32a6adb%2Flocalhost_50000_channel_1_calibration%20(3).png?alt=media" alt=""><figcaption></figcaption></figure>

Click **Next** again. The final screen will show you a table of the calibration points to be applied:

<figure><img src="https://1557066017-files.gitbook.io/~/files/v0/b/gitbook-x-prod.appspot.com/o/spaces%2FSPy42kVbNL57hubF20gF%2Fuploads%2Fgit-blob-5a5f178a8353bf55979f419a3e6f1a3ebbfb8955%2Flocalhost_50000_channel_1_calibration%20(4).png?alt=media" alt=""><figcaption></figcaption></figure>

Click **OK** to apply these values. This will take you back to the main channel settings view where you can see the calibrated **System Value** showing:

<figure><img src="https://1557066017-files.gitbook.io/~/files/v0/b/gitbook-x-prod.appspot.com/o/spaces%2FSPy42kVbNL57hubF20gF%2Fuploads%2Fgit-blob-17df83824f322dda2f7100910465ea9f7b35d3e3%2Flocalhost_50000_channel_1_calibration%20(5).png?alt=media" alt=""><figcaption></figcaption></figure>
